<?xml version="1.0" encoding="utf-8"?><feed xmlns="http://www.w3.org/2005/Atom" ><generator uri="https://jekyllrb.com/" version="3.10.0">Jekyll</generator><link href="https://conordev.com/feed.xml" rel="self" type="application/atom+xml" /><link href="https://conordev.com/" rel="alternate" type="text/html" /><updated>2026-02-21T20:54:01+00:00</updated><id>https://conordev.com/feed.xml</id><title type="html">Conor’s Blog</title><subtitle>A blog where I will share what projects I have been working on, and what I&apos;ve learnt thoughout the way.</subtitle><author><name>Conor Barry</name></author><entry><title type="html">Secure CI/CD for Spring Boot + React on AWS with GitHub Actions and OIDC</title><link href="https://conordev.com/2025/07/15/task-app-aws-cicd.html" rel="alternate" type="text/html" title="Secure CI/CD for Spring Boot + React on AWS with GitHub Actions and OIDC" /><published>2025-07-15T00:00:00+00:00</published><updated>2025-07-15T00:00:00+00:00</updated><id>https://conordev.com/2025/07/15/task-app-aws-cicd</id><content type="html" xml:base="https://conordev.com/2025/07/15/task-app-aws-cicd.html"><![CDATA[<h2 id="objective">Objective</h2>
<p>In my previous blog post, I discussed the architecture decisions, CloudFormation setup, and security considerations for deploying a Spring Boot + React app on AWS.</p>

<p>Building on that foundation, this post will focus on creating a fully automated CI/CD pipeline which will automatically run tests and deploy the application every time code is pushed to GitHub.</p>

<h2 id="revisiting-the-cloud-architecture">Revisiting the Cloud Architecture</h2>
<p>Recall that the cloud infrastructure for this application is deployed via CloudFormation. The backend is deployed to an EC2-backed ECS and the Frontend is deployed to S3 and served through CloudFront.</p>

<p><img src="/images/cloud_arch_task.png" alt="Cloud Architecture Diagram" /></p>

<h2 id="creating-the-cicd-pipeline">Creating the CI/CD pipeline</h2>
<p>I decided to use GitHub Actions instead of AWS tools such as CodePipeline, because it’s both free and easy to use.</p>

<p>Before setting up the pipeline, I needed to address some security considerations and update the CloudFormation template to grant the necessary permissions to allow a successful deployment to AWS.</p>

<h3 id="security-considerations">Security Considerations</h3>

<p>A key security consideration was to use <strong>OIDC (OpenID Connect)</strong> instead of access keys for this deployment.</p>

<p>Malicious bots can automatically scan for the presence of AWS credentials in GitHub repositories resulting in account compromise, or malicious actors using your account to rack up tens of thousands of Euro. I didn’t have to wait long to see such an attempt on my server.</p>

<p><img src="/images/aws_bot_check.PNG" alt="AWS BOT" />
Note: a 200 response is returned because React handles routing client-side, the endpoint doesn’t exist on the server.</p>

<p>The fact that AWS access keys are long lived and don’t expire unless manually rotated poses security risks e.g. it requires storing the access key in GitHub Secrets and rotating it manually which is error prone and easy to neglect.</p>

<p>When using OIDC, GitHub  generates a temporary token which AWS then verifies. This token allows GitHub to assume an IAM role temporarily which limits the scope and duration of AWS access. For this purpose, an GitHubActionsRole IAM role exists in AWS.</p>

<h3 id="adjusting-the-cloudformation-template-for-cicd">Adjusting the CloudFormation template for CI/CD</h3>
<p>I started by amending my CloudFormation template to create a GitHub Actions IAM role that supports OIDC (OpenID Connect) authentication.</p>

<p>This role uses the <code class="language-plaintext highlighter-rouge">sts:AssumeRoleWithWebIdentity</code> action, which allows GitHub Actions to securely assume the role without requiring long lived AWS credentials. The trust policy ensures the request is coming from my GitHub repository for security reasons. I have omitted the code for this for brevity.</p>

<p>To support deployments to ECS, update the ECS service with new task definitions, upload frontend assets to S3, and trigger a CloudFront cache invalidation for fresh content delivery, I also created a custom policy named GitHubActionsDeployPolicy. This policy grants the necessary permissions for my deployment pipeline, as shown below.</p>

<div class="language-yaml highlighter-rouge"><div class="highlight"><pre class="highlight"><code>        <span class="pi">-</span> <span class="na">PolicyName</span><span class="pi">:</span> <span class="s">GitHubActionsDeployPolicy</span>
          <span class="na">PolicyDocument</span><span class="pi">:</span>
            <span class="na">Version</span><span class="pi">:</span> <span class="s1">'</span><span class="s">2012-10-17'</span>
            <span class="na">Statement</span><span class="pi">:</span>
              <span class="pi">-</span> <span class="na">Sid</span><span class="pi">:</span> <span class="s">AllowS3Actions</span>
                <span class="na">Effect</span><span class="pi">:</span> <span class="s">Allow</span>
                <span class="na">Action</span><span class="pi">:</span>
                  <span class="pi">-</span> <span class="s">s3:PutObject</span>
                <span class="na">Resource</span><span class="pi">:</span>
                  <span class="pi">-</span> <span class="kt">!GetAtt</span> <span class="s">FrontendBucket.Arn</span>
                  <span class="pi">-</span> <span class="kt">!Sub</span> <span class="s2">"</span><span class="s">${FrontendBucket.Arn}/*"</span>

              <span class="pi">-</span> <span class="na">Sid</span><span class="pi">:</span> <span class="s">AllowCloudFrontInvalidation</span>
                <span class="na">Effect</span><span class="pi">:</span> <span class="s">Allow</span>
                <span class="na">Action</span><span class="pi">:</span>
                  <span class="pi">-</span> <span class="s">cloudfront:CreateInvalidation</span>
                <span class="na">Resource</span><span class="pi">:</span>
                  <span class="pi">-</span> <span class="kt">!Sub</span> <span class="s2">"</span><span class="s">arn:aws:cloudfront::${AWS::AccountId}:distribution/${CloudFrontDistribution}"</span>
              <span class="pi">-</span> <span class="na">Sid</span><span class="pi">:</span> <span class="s">AllowEcrLogin</span>
                <span class="na">Effect</span><span class="pi">:</span> <span class="s">Allow</span>
                <span class="na">Action</span><span class="pi">:</span>
                  <span class="pi">-</span> <span class="s">ecr:GetAuthorizationToken</span>
                <span class="na">Resource</span><span class="pi">:</span> <span class="s2">"</span><span class="s">*"</span>

              <span class="pi">-</span> <span class="na">Sid</span><span class="pi">:</span> <span class="s">AllowEcsAndEcrDeployments</span>
                <span class="na">Effect</span><span class="pi">:</span> <span class="s">Allow</span>
                <span class="na">Action</span><span class="pi">:</span>
                  <span class="pi">-</span> <span class="s">ecs:UpdateService</span>
                  <span class="pi">-</span> <span class="s">ecs:DescribeServices</span>
                  <span class="pi">-</span> <span class="s">ecr:BatchCheckLayerAvailability</span>
                  <span class="pi">-</span> <span class="s">ecr:InitiateLayerUpload</span>
                  <span class="pi">-</span> <span class="s">ecr:UploadLayerPart</span>
                  <span class="pi">-</span> <span class="s">ecr:CompleteLayerUpload</span>
                  <span class="pi">-</span> <span class="s">ecr:PutImage</span>
                <span class="na">Resource</span><span class="pi">:</span>
                  <span class="pi">-</span> <span class="kt">!Sub</span> <span class="s2">"</span><span class="s">arn:aws:ecs:${AWS::Region}:${AWS::AccountId}:cluster/${ECSCluster}"</span>
                  <span class="pi">-</span> <span class="kt">!Sub</span> <span class="s2">"</span><span class="s">arn:aws:ecs:${AWS::Region}:${AWS::AccountId}:service/${ECSCluster}/*"</span>
                  <span class="pi">-</span> <span class="kt">!Sub</span> <span class="s2">"</span><span class="s">arn:aws:ecr:${AWS::Region}:${AWS::AccountId}:repository/taskapp"</span>
</code></pre></div></div>

<h3 id="github-actions-cicd">GitHub Actions CI/CD</h3>

<p>Using GitHub Actions, I created a CI/CD pipeline that is triggered when I push to my aws_deploy branch.</p>

<p>Notice below I divided this pipeline into several sections. This makes it easier to visualise what parts of the pipeline have succeeded or failed, allowing for easier debugging.</p>

<h4 id="building-and-testing-the-frontend">Building and Testing the Frontend</h4>
<p>Building the frontend is very simple so I have omitted the code for brevity. It involves checking out the code, installing dependencies using <code class="language-plaintext highlighter-rouge">npm ci</code> and then building using <code class="language-plaintext highlighter-rouge">npm run build</code></p>

<p>As I deploy the build in separate stage, I use the <code class="language-plaintext highlighter-rouge">actions/upload-artifact@v4</code> action to make the build available in the deployment stage.</p>

<h4 id="deploying-the-frontend">Deploying the Frontend</h4>
<p>Deploying the frontend is relatively simple, I use <strong>OIDC</strong> to gain temporary credentials and assume the GitHub Actions Role, then use the frontend build which was generated in a prior stage and upload it to S3 and invalidate the CloudFront cache to ensure users see the latest version of my application.</p>

<div class="language-yaml highlighter-rouge"><div class="highlight"><pre class="highlight"><code>  <span class="na">deploy-frontend</span><span class="pi">:</span>
    <span class="na">name</span><span class="pi">:</span> <span class="s">Deploy Frontend to AWS</span>
    <span class="na">runs-on</span><span class="pi">:</span> <span class="s">ubuntu-latest</span>
    <span class="na">needs</span><span class="pi">:</span> <span class="s">build-frontend</span>
    <span class="na">permissions</span><span class="pi">:</span>
      <span class="na">id-token</span><span class="pi">:</span> <span class="s">write</span>
      <span class="na">contents</span><span class="pi">:</span> <span class="s">read</span>
    <span class="na">steps</span><span class="pi">:</span>
      <span class="pi">-</span> <span class="na">name</span><span class="pi">:</span> <span class="s">Checkout</span>
        <span class="na">uses</span><span class="pi">:</span> <span class="s">actions/checkout@v4.1.1</span>

      <span class="pi">-</span> <span class="na">name</span><span class="pi">:</span> <span class="s">Configure AWS credentials</span>
        <span class="na">uses</span><span class="pi">:</span> <span class="s">aws-actions/configure-aws-credentials@v4</span>
        <span class="na">with</span><span class="pi">:</span>
          <span class="na">role-to-assume</span><span class="pi">:</span> <span class="s">arn:aws:iam::${{ secrets.AWS_ACCOUNT_ID }}:role/GitHub_Actions_Role</span>
          <span class="na">aws-region</span><span class="pi">:</span> <span class="s">eu-west-1</span>

      <span class="pi">-</span> <span class="na">name</span><span class="pi">:</span> <span class="s">Download frontend build</span>
        <span class="na">uses</span><span class="pi">:</span> <span class="s">actions/download-artifact@v4</span>
        <span class="na">with</span><span class="pi">:</span>
          <span class="na">name</span><span class="pi">:</span> <span class="s">frontend-dist</span>
          <span class="na">path</span><span class="pi">:</span> <span class="s">frontend/dist</span>

      <span class="pi">-</span> <span class="na">name</span><span class="pi">:</span> <span class="s">Upload build to S3</span>
        <span class="na">run</span><span class="pi">:</span> <span class="pi">|</span>
          <span class="s">aws s3 cp frontend/dist s3://${{ secrets.AWS_S3_BUCKET }}/ --recursive</span>

      <span class="pi">-</span> <span class="na">name</span><span class="pi">:</span> <span class="s">Invalidate CloudFront cache</span>
        <span class="na">run</span><span class="pi">:</span> <span class="pi">|</span>
          <span class="s">aws cloudfront create-invalidation \</span>
            <span class="s">--distribution-id ${{ secrets.CLOUDFRONT_DIST_ID }} \</span>
            <span class="s">--paths "/*"</span>
</code></pre></div></div>

<h4 id="building-and-testing-the-backend">Building and Testing the Backend</h4>

<p>This is quite straightforward. I use a ARM based runner as the EC2 instances I use are ARM based, checkout the code, set up the JDK and build the backend with Maven and finally run the backend tests using Maven.</p>

<div class="language-yaml highlighter-rouge"><div class="highlight"><pre class="highlight"><code>  <span class="na">build-backend</span><span class="pi">:</span>
    <span class="na">name</span><span class="pi">:</span> <span class="s">Build &amp; Test Backend</span>
    <span class="na">runs-on</span><span class="pi">:</span> <span class="s">ubuntu-24.04-arm</span>
    <span class="na">steps</span><span class="pi">:</span>
      <span class="pi">-</span> <span class="na">name</span><span class="pi">:</span> <span class="s">Checkout code</span>
        <span class="na">uses</span><span class="pi">:</span> <span class="s">actions/checkout@v4</span>

      <span class="pi">-</span> <span class="na">name</span><span class="pi">:</span> <span class="s">Set up JDK</span>
        <span class="na">uses</span><span class="pi">:</span> <span class="s">actions/setup-java@v4</span>
        <span class="na">with</span><span class="pi">:</span>
          <span class="na">distribution</span><span class="pi">:</span> <span class="s1">'</span><span class="s">temurin'</span>
          <span class="na">java-version</span><span class="pi">:</span> <span class="s1">'</span><span class="s">17'</span>

      <span class="pi">-</span> <span class="na">name</span><span class="pi">:</span> <span class="s">Clean and Build Backend with Maven</span>
        <span class="na">run</span><span class="pi">:</span> <span class="pi">|</span>
          <span class="s">cd backend</span>
          <span class="s">mvn clean install -DskipTests</span>

      <span class="pi">-</span> <span class="na">name</span><span class="pi">:</span> <span class="s">Run Tests with Maven</span>
        <span class="na">run</span><span class="pi">:</span> <span class="pi">|</span>
          <span class="s">cd backend</span>
          <span class="s">mvn test</span>
</code></pre></div></div>

<h4 id="deploying-the-backend">Deploying the backend</h4>

<p>To deploy the backend, GitHub Actions uses OIDC to gain the necessary temporary permissions. The backend Docker image is then built, tagged, and pushed to <strong>Amazon ECR (Elastic Container Registry)</strong>. Finally the ECS Service is updated to ensure the latest version of the backend is fully deployed. Note that secrets such as <strong>AWS_ACCOUNT_ID</strong> are securely stored in <strong>GitHub Secrets</strong>.</p>

<div class="language-yaml highlighter-rouge"><div class="highlight"><pre class="highlight"><code>  <span class="na">build-deploy-backend</span><span class="pi">:</span>
    <span class="na">name</span><span class="pi">:</span> <span class="s">Build &amp; Deploy Backend to ECS</span>
    <span class="na">runs-on</span><span class="pi">:</span> <span class="s">ubuntu-24.04-arm</span>
    <span class="na">needs</span><span class="pi">:</span> <span class="s">build-backend</span>
    <span class="na">permissions</span><span class="pi">:</span>
      <span class="na">id-token</span><span class="pi">:</span> <span class="s">write</span>
      <span class="na">contents</span><span class="pi">:</span> <span class="s">read</span>
    <span class="na">steps</span><span class="pi">:</span>
      <span class="pi">-</span> <span class="na">name</span><span class="pi">:</span> <span class="s">Checkout</span>
        <span class="na">uses</span><span class="pi">:</span> <span class="s">actions/checkout@v4</span>

      <span class="pi">-</span> <span class="na">name</span><span class="pi">:</span> <span class="s">Configure AWS credentials</span>
        <span class="na">uses</span><span class="pi">:</span> <span class="s">aws-actions/configure-aws-credentials@v4</span>
        <span class="na">with</span><span class="pi">:</span>
          <span class="na">role-to-assume</span><span class="pi">:</span> <span class="s">arn:aws:iam::${{ secrets.AWS_ACCOUNT_ID }}:role/GitHub_Actions_Role</span>
          <span class="na">aws-region</span><span class="pi">:</span> <span class="s">eu-west-1</span>
 
      <span class="pi">-</span> <span class="na">name</span><span class="pi">:</span> <span class="s">Build Docker image (native ARM64)</span>
        <span class="na">run</span><span class="pi">:</span> <span class="pi">|</span>
          <span class="s">docker build -t taskapp:latest ./backend</span>
      <span class="pi">-</span> <span class="na">name</span><span class="pi">:</span> <span class="s">Login to Amazon ECR</span>
        <span class="na">run</span><span class="pi">:</span> <span class="pi">|</span>
          <span class="s">aws ecr get-login-password --region eu-west-1 | docker login --username AWS --password-stdin ${{ secrets.AWS_ACCOUNT_ID }}.dkr.ecr.eu-west-1.amazonaws.com</span>

      <span class="pi">-</span> <span class="na">name</span><span class="pi">:</span> <span class="s">Tag and Push the Docker Image to ECR</span>
        <span class="na">run</span><span class="pi">:</span> <span class="pi">|</span>
          <span class="s">docker tag taskapp:latest ${{ secrets.AWS_ACCOUNT_ID }}.dkr.ecr.eu-west-1.amazonaws.com/taskapp:latest</span>
          <span class="s">docker push ${{ secrets.AWS_ACCOUNT_ID }}.dkr.ecr.eu-west-1.amazonaws.com/taskapp:latest</span>

      <span class="pi">-</span> <span class="na">name</span><span class="pi">:</span> <span class="s">Update ECS Service</span>
        <span class="na">run</span><span class="pi">:</span> <span class="pi">|</span>
          <span class="s">aws ecs update-service \</span>
            <span class="s">--cluster ${{ secrets.ECS_CLUSTER_NAME }} \</span>
            <span class="s">--service ${{ secrets.ECS_SERVICE_NAME }} \</span>
            <span class="s">--force-new-deployment</span>
</code></pre></div></div>

<h4 id="comparison-of-docker-buildx-vs-native-arm-64-runner">Comparison of Docker Buildx vs native ARM 64 runner</h4>
<p>Initially I was using Docker Buildx to cross compile for ARM since the EC2 instance has an ARM based architecture. This was very slow and resulted in the pipeline taking over 6 minutes to complete upon each push to GitHub.</p>

<p><img src="/images/cicd-prenative.png" alt="CI/CD BuildX" /></p>

<p>As of January 2025, GitHub Actions now supports native ARM runners which reduced deployment time to roughly 2 minutes.
<img src="/images/cicd-native.PNG" alt="CI/CD Native" /></p>

<h2 id="lessons-learnt">Lessons learnt</h2>
<ul>
  <li>Use OIDC instead of access keys for better security</li>
  <li>Use native GitHub Actions runner for faster deployments where possible</li>
</ul>

<h2 id="conclusion">Conclusion</h2>
<p>I really enjoyed learning how to build secure CI/CD pipelines to deploy applications to AWS. It allowed me to optimise my workflow as well as cut deployment time in half.</p>]]></content><author><name>Conor Barry</name></author><category term="Other" /><summary type="html"><![CDATA[Objective In my previous blog post, I discussed the architecture decisions, CloudFormation setup, and security considerations for deploying a Spring Boot + React app on AWS.]]></summary></entry><entry><title type="html">Deploying a Spring Boot + React App on AWS Using CloudFormation (ECS-EC2, ALB, S3)</title><link href="https://conordev.com/2025/06/04/task-app-aws.html" rel="alternate" type="text/html" title="Deploying a Spring Boot + React App on AWS Using CloudFormation (ECS-EC2, ALB, S3)" /><published>2025-06-04T00:00:00+00:00</published><updated>2025-06-04T00:00:00+00:00</updated><id>https://conordev.com/2025/06/04/task-app-aws</id><content type="html" xml:base="https://conordev.com/2025/06/04/task-app-aws.html"><![CDATA[<h3 id="objective">Objective</h3>
<p>I wanted to gain experience with industry-standard AWS deployment practices, so I decided to rework the infrastructure behind my existing Task Manager app. The app itself which was built with a Spring Boot REST API backend and a React frontend remains unchanged. What’s different is how it’s deployed.</p>

<p>Previously, the app was deployed to Oracle Cloud using Docker Compose and a CI/CD pipeline. This time, I wanted to create an AWS-centric environment. A key constraint was to minimise the cost and as much as possible, stay within free tier limits.
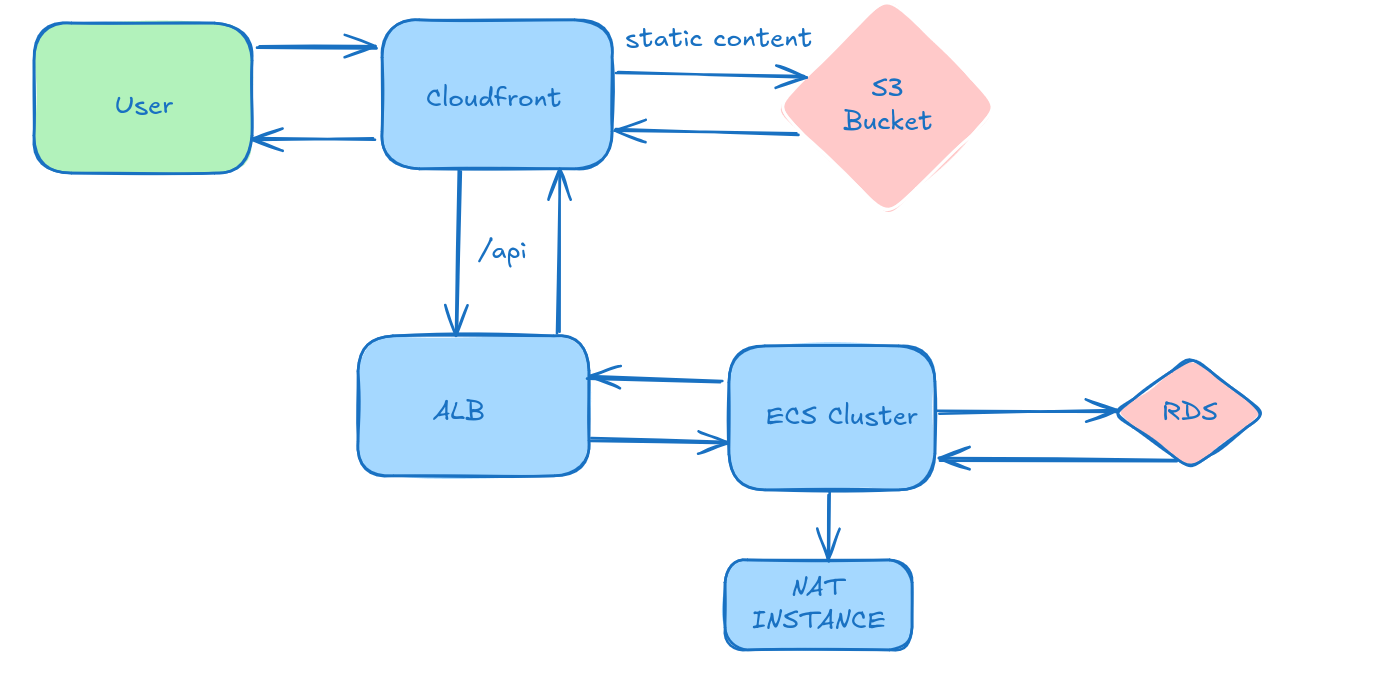
</p>

<h2 id="cloud-architecture">Cloud Architecture</h2>

<p>As illustrated in the diagram below, the user interacts with CloudFront, which intelligently routes requests for static content to an S3 bucket and API calls to the Application Load Balancer (ALB). Note the VPC and Internet Gateway are omitted here for brevity.</p>

<p><img src="/images/cloud_arch_task.png" alt="Cloud Architecture Diagram" /></p>

<h3 id="design-decisions">Design Decisions</h3>
<h4 id="backend">Backend</h4>

<h4 id="lambda-vs-ecs-ec2-vs-fargate">Lambda vs ECS-EC2 vs Fargate</h4>
<p>AWS Lambda (Serverless)</p>

<ul>
  <li>Fully managed, scales automatically with demand</li>
  <li>Cold starts can be significant for Java applications like Spring Boot</li>
</ul>

<h4 id="ecs-with-ec2-launch-type">ECS with EC2 Launch Type</h4>

<ul>
  <li>Full control over EC2 instance</li>
  <li>Can use a free tier EC2 instance to minimise costs</li>
  <li>Requires manual management of instance lifecycle and scaling policies</li>
</ul>

<h4 id="amazon-ecs-with-fargate">Amazon ECS with Fargate</h4>

<ul>
  <li>No need to manage EC2 instances</li>
  <li>Seamless scaling</li>
  <li>Does not appear to be free tier eligible</li>
</ul>

<p>Decision: I chose ECS (EC2) as it offers a balance between cost, flexibility, and suitability for a containerised Spring Boot app. It allows me to stay within the AWS Free Tier while still simulating a production-like environment.  ECS also provides container orchestration capabilities such as service discovery, load balancing, health checks, and auto-recovery of failed containers.</p>

<h3 id="database">Database</h3>
<p>I chose Amazon RDS with MySQL to meet the application’s original requirements without modifying the codebase.</p>

<h4 id="why-rds">Why RDS?</h4>
<ul>
  <li>Managed database which has many benefits such as automated backups, patching, and scaling</li>
  <li>Simplifies setup and management compared to self-hosted alternatives</li>
  <li>Can stay within Free Tier limits if you use a db.t3.micro instance</li>
</ul>

<h4 id="why-not-self-hosted-mysql-in-ecs">Why not self-hosted MySQL in ECS?</h4>

<ul>
  <li>Adds unnecessary operational overhead (no managed backups, scaling or failure recovery)</li>
  <li>Increase complexity without offering substantial benefits for this project</li>
</ul>

<h4 id="application-load-balancer-alb">Application Load Balancer (ALB)</h4>

<p>While the primary role of a load balancer is to distribute incoming traffic, AWS Application Load Balancer (ALB) offers additional benefits such as:</p>

<ul>
  <li>
    <p><strong>Health Checks:</strong> ALB provides robust health checks at the application layer, allowing it to monitor the actual responsiveness of the application endpoint. This ensures that traffic is only sent to truly healthy instances, improving application availability</p>
  </li>
  <li>
    <p>No longer need to worry about EC2 instance IPs changing (e.g. on restart) as we are using the public DNS of the ALB</p>
  </li>
</ul>

<p><img src="/images/asg-health.PNG" alt="Cloud Architecture" /></p>

<p>It’s worth noting that while I limited the number of instances to reduce costs, the setup can be easily scaled to increase availability and performance if needed.</p>

<h3 id="networking">Networking:</h3>

<p>Using a NAT Gateway in eu-west-1 would cost <strong>~$34.56/month</strong> + data charges which is far too expensive for a proof-of-concept. Instead, I used a NAT instance to keep the costs down.</p>

<p>It’s worth noting that while a NAT Gateway is fully managed and more scalable, using a NAT instance can be significantly cheaper even after accounting for the cost of an extra EC2 instance (since NAT functionality requires one instance to act as the NAT).</p>

<p>Although this setup would normally exceed the AWS Free Tier limit, I was able to offset this charge entirely as AWS approved my $300 free credits application.</p>

<p>As the ECS (EC2) backend is inside a private subnet in order to prevent direct internet access to it for security reasons, the NAT instance is needed to pull Docker images from ECR (Elastic Container Registry).</p>

<h3 id="frontend">Frontend</h3>

<p>The main choices for the frontend was to either deploy it in ECS-EC2 like the backend or instead use S3 + CloudFront. The latter was the obvious choice as it has the benefits of:</p>
<ul>
  <li>DDOS protection</li>
  <li>Decoupling of frontend and backend logic</li>
  <li>TLS support through ACM (AWS Certificate Manager)</li>
  <li>Use of a CDN to cache content in edge locations while remaining a low cost option (effectively free) for a low traffic application such as mine.</li>
</ul>

<p>ECS-EC2, on the other hand, would have introduced additional operational overhead with no clear benefits especially since I wasn’t using server-side rendering (SSR).</p>

<h2 id="deployment">Deployment</h2>

<p>As mentioned previously, one of my goals was to be able to deploy this app without having to modify the existing code base. A key enabler of this was the use of an Infrastructure as Code (IAC) approach which allows the  provisioning IT infrastructure through code, rather through graphical interfaces. This code becomes a version-controlled, repeatable template that can be deployed multiple times in different environments.</p>

<p>I chose to use CloudFormation for my IAC. Which provides the following benefits:</p>

<ul>
  <li>
    <p>The application’s underlying code doesn’t have to know it’s using AWS, avoiding vendor lock in</p>
  </li>
  <li>
    <p>The application code does not need to call the AWS SDK to fetch secrets (e.g. db password). ECS injects them, which again keeps the app portable</p>
  </li>
  <li>
    <p>Can roll back changes in case of failure</p>
  </li>
  <li>
    <p>Reproducible deployments</p>
  </li>
</ul>

<p>Here we fetch the secrets from Secrets Manager in the <code class="language-plaintext highlighter-rouge">ECSTaskDefinition</code>, avoiding hard-coding sensitive information in the template.</p>

<div class="language-yaml highlighter-rouge"><div class="highlight"><pre class="highlight"><code><span class="na">Environment</span><span class="pi">:</span>
<span class="pi">-</span> <span class="na">Name</span><span class="pi">:</span> <span class="s">SPRING_DATASOURCE_USERNAME</span>
  <span class="na">Value</span><span class="pi">:</span> <span class="kt">!Sub</span> <span class="s2">"</span><span class="s">{{resolve:secretsmanager:/taskapp/db-credentials:SecretString:username}}"</span>
<span class="pi">-</span> <span class="na">Name</span><span class="pi">:</span> <span class="s">SPRING_DATASOURCE_PASSWORD</span>
  <span class="na">Value</span><span class="pi">:</span> <span class="kt">!Sub</span> <span class="s2">"</span><span class="s">{{resolve:secretsmanager:/taskapp/db-credentials:SecretString:password}}"</span>
<span class="pi">-</span> <span class="na">Name</span><span class="pi">:</span> <span class="s">JWT_SECRET</span>
  <span class="na">Value</span><span class="pi">:</span> <span class="kt">!Sub</span> <span class="s2">"</span><span class="s">{{resolve:secretsmanager:/taskapp/db-credentials:SecretString:jwt}}"</span>
</code></pre></div></div>

<p>As I am using a t4g.small instance for my EC2 backed ECS which runs on ARM it was necessary to cross compile the docker image for the backend to ARM64 before pushing the image to ECR (Elastic Container Registry), so it could run on the instance. ECR is essentially just a private Docker image repository.</p>

<p>Given the full template is over 600 lines, here’s a concise summary of the main components:</p>

<ul>
  <li>
    <p><strong>Networking</strong>: Sets up a VPC with public and private subnets across two Availability Zones, an Internet Gateway, and route tables. It also includes a NAT instance (as an alternative to a NAT Gateway) to allow private subnets to access the internet</p>
  </li>
  <li>
    <p><strong>Security Groups and IAM roles</strong>: More on this later</p>
  </li>
  <li>
    <p><strong>ECS Task Definition and Service</strong>: Defines an ECS task definition for the taskapp-container using a Docker image from ECR, An ECS service is created to run and maintain the desired count of tasks on the ECS cluster, integrating with the ALB.</p>
  </li>
  <li>
    <p><strong>ECSLogGroup</strong>: Contains CloudWatch logs from the SpringBoot backend, helpful for debugging</p>
  </li>
  <li>
    <p><strong>ALB</strong>: Creates an Application Load Balancer (ALB), a target group for the ECS service, and an ALB listener to forward HTTP traffic to the ECS tasks.</p>
  </li>
  <li>
    <p><strong>RDS (MySQL)</strong>: Database: Provisions a MySQL RDS instance</p>
  </li>
  <li>
    <p><strong>S3 + CloudFront</strong> for React Frontend: Sets up an S3 bucket to host the static React frontend, along with a bucket policy to allow CloudFront access</p>
  </li>
  <li>
    <p><strong>Outputs</strong>: Outputs the CloudFront URL for the frontend, can be used as the CNAME target when configuring a custom subdomain (e.g., app.example.com).</p>
  </li>
</ul>

<p>One challenge when using CloudFormation at first was that if the stack failed to create, it would delete the logs making troubleshooting difficult, but there is an option to retain the logs even after stack deletion.</p>

<h3 id="security-considerations">Security Considerations</h3>

<p>As much as possible, I tried to adhere to AWS security best practices for my deployment.</p>

<p><strong>Secrets Manager</strong></p>
<ul>
  <li>Extremely important to not hardcode sensitive secrets in CloudFormation, there have been cases of compromised secrets through this, leading to AWS bills in the 10’s of thousands!</li>
  <li>Database secrets and JWT token are encrypted by AES-256 and fetched from the SecretsManager</li>
</ul>

<p><strong>Session Manager vs Instance Connect</strong></p>
<ul>
  <li>AWS recommends using Session Manager instead of Instance Connect as it allows the SSH port to be closed, reducing the attack surface</li>
</ul>

<p><strong>CloudFront</strong></p>
<ul>
  <li>Provides DDOS protection by default</li>
  <li>ViewerProtocolPolicy: redirect-to-https forces secure access</li>
  <li>Security Headers set to the AWS managed security policy (e.g. provides HSTS and X-Frame-Options headers)</li>
  <li>S3 access control: Origin Access Control (OAC) ensures only CloudFront can access the S3 bucket</li>
</ul>

<div class="language-yaml highlighter-rouge"><div class="highlight"><pre class="highlight"><code>  <span class="na">FrontendBucketPolicy</span><span class="pi">:</span>
    <span class="na">Type</span><span class="pi">:</span> <span class="s">AWS::S3::BucketPolicy</span>
    <span class="na">Properties</span><span class="pi">:</span>
      <span class="na">Bucket</span><span class="pi">:</span> <span class="kt">!Ref</span> <span class="s">FrontendBucket</span>
      <span class="na">PolicyDocument</span><span class="pi">:</span>
        <span class="na">Version</span><span class="pi">:</span> <span class="s1">'</span><span class="s">2012-10-17'</span>
        <span class="na">Statement</span><span class="pi">:</span>
          <span class="pi">-</span> <span class="na">Effect</span><span class="pi">:</span> <span class="s">Allow</span>
            <span class="na">Principal</span><span class="pi">:</span>
              <span class="na">Service</span><span class="pi">:</span> <span class="s">cloudfront.amazonaws.com</span>
            <span class="na">Action</span><span class="pi">:</span> <span class="s">s3:GetObject</span>
            <span class="na">Resource</span><span class="pi">:</span> <span class="kt">!Sub</span> <span class="s1">'</span><span class="s">arn:aws:s3:::${FrontendBucket}/*'</span>
            <span class="na">Condition</span><span class="pi">:</span>
              <span class="na">StringEquals</span><span class="pi">:</span>
                <span class="s">AWS:SourceArn: !Sub "arn:aws:cloudfront::${AWS::AccountId}:distribution/${CloudFrontDistribution}"</span>

  <span class="na">CloudFrontOAC</span><span class="pi">:</span>
    <span class="na">Type</span><span class="pi">:</span> <span class="s">AWS::CloudFront::OriginAccessControl</span>
    <span class="na">Properties</span><span class="pi">:</span>
      <span class="na">OriginAccessControlConfig</span><span class="pi">:</span>
        <span class="na">Name</span><span class="pi">:</span> <span class="kt">!Sub</span> <span class="s1">'</span><span class="s">${AWS::StackName}-FrontendOAC'</span>
        <span class="na">SigningBehavior</span><span class="pi">:</span> <span class="s">always</span>
        <span class="na">SigningProtocol</span><span class="pi">:</span> <span class="s">sigv4</span>
        <span class="na">OriginAccessControlOriginType</span><span class="pi">:</span> <span class="s">s3</span>

</code></pre></div></div>
<p>Note in the ARN, the CloudFront distribution created elsewhere in the template is referenced as the condition, this ensures that only that specific CloudFront distribution is allowed to access the S3 bucket.</p>

<p><strong>RDS</strong></p>
<ul>
  <li>The database is not publicly accessible, reducing the attack surface</li>
  <li>RDSToECSTaskIngressRule: Allows TCP 3306 from <strong>ECSTaskSecurityGroup</strong>. Restricts database access solely to the ECS tasks that need to connect to it</li>
  <li>RDS in contained within a <strong>private subnet</strong></li>
  <li>Secrets obtained from Secrets Manager</li>
</ul>

<p><strong>VPC &amp; Networking</strong>:
Provides a dedicated, isolated network</p>

<p><strong>Security Token Service (STS)</strong></p>
<ul>
  <li>STS: AssumeRole provides temporary credentials eliminating the need to store access keys in code. This eliminates the risk of credentials accidentally being exposed (e.g., in Git repos or logs)</li>
  <li>AssumeRolePolicyDocument defines who can assume the role</li>
</ul>

<div class="language-yaml highlighter-rouge"><div class="highlight"><pre class="highlight"><code>  <span class="na">ECSInstanceRole</span><span class="pi">:</span>
    <span class="na">Type</span><span class="pi">:</span> <span class="s">AWS::IAM::Role</span>
    <span class="na">Properties</span><span class="pi">:</span>
      <span class="na">AssumeRolePolicyDocument</span><span class="pi">:</span>
        <span class="na">Version</span><span class="pi">:</span> <span class="s2">"</span><span class="s">2012-10-17"</span>
        <span class="na">Statement</span><span class="pi">:</span>
          <span class="pi">-</span> <span class="na">Effect</span><span class="pi">:</span> <span class="s">Allow</span>
            <span class="na">Principal</span><span class="pi">:</span>
              <span class="na">Service</span><span class="pi">:</span> <span class="s">ec2.amazonaws.com</span>
            <span class="na">Action</span><span class="pi">:</span> <span class="s">sts:AssumeRole</span>
      <span class="na">ManagedPolicyArns</span><span class="pi">:</span>
        <span class="pi">-</span> <span class="s">arn:aws:iam::aws:policy/service-role/AmazonEC2ContainerServiceforEC2Role</span>
        <span class="pi">-</span> <span class="s">arn:aws:iam::aws:policy/AmazonEC2ContainerRegistryReadOnly</span>
        <span class="pi">-</span> <span class="s">arn:aws:iam::aws:policy/CloudWatchAgentServerPolicy</span>
        <span class="pi">-</span> <span class="s">arn:aws:iam::aws:policy/AmazonSSMManagedInstanceCore</span>
</code></pre></div></div>

<p><strong>AWS Certificate Manager (ACM)</strong></p>
<ul>
  <li>TLS certificate generated in ACM through DNS validation</li>
  <li>ACM can auto-renew the certificate</li>
  <li>The certificate can be attached to CloudFront, enabling HTTPS for the frontend with a custom domain</li>
</ul>

<h2 id="lessons-learnt">Lessons learnt</h2>
<ul>
  <li>Use correct AMI (e.g. using old AMIs could introduce security flaws)</li>
  <li>Be careful to research the cost of using each service</li>
  <li>Setup billing alarms to keep an eye on costs incurred</li>
  <li>Avoid CloudFormation stack rollback on failure: Enable log retention and manual deletion for better debugging</li>
  <li>Use the DependsOn attribute in CloudFormation to ensure resources in the stack are created in the right order</li>
  <li>Debugging Tip: At times CloudFormation can appear to hang. I found it helpful to get Early Error Detection by checking the ECS Task Status, CloudWatch and Health Checks status</li>
  <li>Certificate for CloudFront must be created in <strong>us-east-1</strong> region</li>
</ul>

<h2 id="future-enhancements">Future Enhancements</h2>
<ul>
  <li>Add a CI/CD pipeline to upload frontend code to S3 to invalidate the cache and upload backend to ECR</li>
  <li>In a production environment with real users, enable CloudTrail and GuardDuty for increased security (cost involved)</li>
  <li>If cost wasn’t an issue, use NAT Gateway instead of a NAT instance</li>
  <li>Could use the Cloud Development Kit (CDK) to create the CloudFormation template</li>
</ul>

<h2 id="conclusion">Conclusion</h2>
<p>I really enjoyed completing this project and deepening my understanding of AWS infrastructure. It gave me hands-on experience with IaC, container orchestration, and secure cloud deployment</p>]]></content><author><name>Conor Barry</name></author><category term="Other" /><summary type="html"><![CDATA[Objective I wanted to gain experience with industry-standard AWS deployment practices, so I decided to rework the infrastructure behind my existing Task Manager app. The app itself which was built with a Spring Boot REST API backend and a React frontend remains unchanged. What’s different is how it’s deployed.]]></summary></entry><entry><title type="html">Crafting an AI Prompt App with Scrum: A 6-Week Coding Adventure</title><link href="https://conordev.com/2025/04/20/chinguvoyage.html" rel="alternate" type="text/html" title="Crafting an AI Prompt App with Scrum: A 6-Week Coding Adventure" /><published>2025-04-20T00:00:00+00:00</published><updated>2025-04-20T00:00:00+00:00</updated><id>https://conordev.com/2025/04/20/chinguvoyage</id><content type="html" xml:base="https://conordev.com/2025/04/20/chinguvoyage.html"><![CDATA[<h3 id="introduction">Introduction</h3>
<p><a href="https://chingu.io">Chingu</a> is an online platform that brings together Scrum Masters and developers from around the world to participate in a collaborative six-week voyage (project). During this time, teams work together to deliver an app, all while adhering to Scrum principles. <br />
Our recent project was the creation of an AI prompt app, from the initial concept to a deployed app at the end.</p>

<h3 id="starting-the-voyage">Starting the Voyage</h3>
<p>We were a team of seven, consisting of five developers, a Scrum Master, and a Shadow Scrum Master. <br />
To kick off our voyage, we began brainstorming ideas for a project we could complete within six weeks. After discussing various options, we decided to create an AI Prompt App that integrates with the Google Gemini API.<br />
This app features a pentagram-style form, allowing users to create and submit custom queries to the AI model by filling in five key components:</p>

<ul>
  <li><strong>Persona</strong>: Defines the role or identity of the AI for context.</li>
  <li><strong>Context</strong>: Describes the background or scenario in which the AI should operate.</li>
  <li><strong>Task</strong>: Specifies the task or action the AI should perform.</li>
  <li><strong>Output</strong>: Details the desired outcome or format for the AI’s response.</li>
  <li><strong>Constraint</strong>: Sets any limitations or boundaries for the AI’s response.</li>
</ul>

<p>With a clear concept in place, we moved on to defining a simple yet functional Minimum Viable Product (MVP). Estimating development time at this stage was challenging, so we kept the scope minimal and allocated a week for bug fixes. To stay user-focused, one team member created a Figma flow illustrating the app’s pages and how they should behave based on user login status, which was then reviewed and refined by the team.</p>

<p>From this, the Scrum Masters created a Jira board with a backlog of all tasks to be completed for our MVP (and some stretch goals). We agreed on a tech stack (see below), and agreed on some ground rules (such as daily standups, a GitHub workflow etc.).</p>

<p><img src="/images/jira_board.PNG" alt="JIRA board" /></p>

<h3 id="tech-stack">Tech Stack</h3>
<ul>
  <li><strong>Backend</strong>: NodeJS, Express, TypeScript</li>
  <li><strong>Frontend</strong>: React, Tailwind CSS, TypeScript</li>
  <li><strong>Database</strong>: PostgreSQL (hosted on Supabase)</li>
  <li><strong>Deployment &amp; Hosting</strong>: Nginx, Render, Netlify</li>
  <li><strong>Collaboration</strong>: Jira</li>
  <li><strong>Prototyping</strong>: Figma</li>
</ul>

<h2 id="development-experience">Development Experience</h2>
<p>As mentioned above, we were a team of seven, all from different backgrounds and all bringing different skills / perspectives to the voyage.</p>

<p>We decided on a 3 meetings a week approach (with daily standups in between), in theory, we’d have one day to introduce the sprint (with each sprint being 5 days long), add items from the backlog to the sprint and assign developers to those tasks. Then, we would have a meeting mid-week to discuss any challenges that came up and then finally on a Friday, one quick meeting to close off the sprint and hold a sprint retrospective.</p>

<p>At times, it was helpful for team members to divide into unofficial “sub-groups” to work collaboratively on a feature. When this happened, it allowed bugs to be addressed early as well as improving the coding practices early on.</p>

<p>On the technical side of things, it was my first time using NodeJS + Express + TypeScript as well as PostgreSQL. While NodeJS + Express was a bit of learning curve for me, I enjoyed using them. On the other hand, I found PostgreSQL quite easy as I was already familiar with MySQL, and TypeScript was reasonably straightforward. <br />
We created a REST API for the frontend to communicate with the backend and vice versa and secured the endpoints with JWT based authentication.</p>

<p>At the end of the voyage, I am proud to say that we collectively achieved our MVP and deployed the fully working application to the web.</p>

<h3 id="git-best-practices">Git Best Practices</h3>
<p>We strove to adhere to Git best practices in this voyage. Our workflow consisted of feature branches, hotfix branches, a development branch and a main branch. <br />
We disallowed direct pushes to the development or main branch in order to isolate any bugs that occurred in the feature branch where they occurred. When a developer was satisfied their feature was complete, they created a Pull Request (PR) to merge their feature branch into the development branch, which another developer would have to approve (or request changes) before merging the changes. Similarly, at the end of a sprint a PR would be created to merge the development branch into the main branch.</p>

<h2 id="testing">Testing</h2>
<p>Given the time constraints, testing on this project was limited to validating API responses using Postman and having developers manually test each other’s PRs.</p>

<p>If we had more time, I would have liked to add automated tests using Jest and SuperTest to ensure the API endpoints returned the expected responses. Additionally, I would have liked to set up continuous integration using GitHub Actions to automatically run these tests on every push to the repository</p>

<h2 id="documentation">Documentation</h2>
<p>We used Swagger to document the REST API endpoints. This will make it easier to maintain the app in the future and help any new developers quickly understand how the API works.</p>

<h2 id="deployment">Deployment</h2>
<p>For deployment, the goal was to have a completely free deployment that didn’t require a credit card. We decided on Netlify + Render.</p>

<p>Render has “cold-starts” whereby the user may experience a delay if the app hasn’t been used recently. This is a limitation of the free tier but it was a tradeoff we were willing to accept as this app is mainly a proof of concept.</p>

<p>One of the challenges was coming up with a hosted database that didn’t have any excessive restrictions (e.g. Render automatically deletes the database 30 days after creation if you use the free tier.)<br />
In the interests of saving time, we decided to initially use a local PostgreSQL database while we researched what hosted database to use, knowing that when we eventually decided on what hosted DB to use, the code changes would be minimal.</p>

<p>Eventually, we decided on a Supabase hosted DB, which was very easy to set up.</p>

<h2 id="deployed-app">Deployed App</h2>
<p><a href="https://askiq-live.netlify.app/">Press here to access the AskIQ App</a></p>

<p><img src="/images/askiq_demo.PNG" alt="ASK_IQ_DEMO" /></p>

<h2 id="lessons-learnt">Lessons Learnt</h2>
<ul>
  <li>
    <p>Importance of daily standups / communication so issues can be addressed quickly and “head-on”</p>
  </li>
  <li>
    <p>Avoiding “scope change” (e.g. don’t deviate from the MVP at late stages during a sprint)</p>
  </li>
  <li>
    <p>Keeping meetings action based and focus on achieving the MVP</p>
  </li>
  <li>
    <p>Avoid overcomplicatating the organisational side of the project (e.g. for this small project, Trello might have been simpler than Jira)</p>
  </li>
</ul>

<h2 id="future-enhancements">Future Enhancements</h2>
<ul>
  <li>
    <p>Allow users to save personas and load them subsequently</p>
  </li>
  <li>
    <p>Add rate limits to the app</p>
  </li>
  <li>
    <p>Add unit and integration testing</p>
  </li>
  <li>
    <p>Minimise the “cold-starts” on Render</p>
  </li>
</ul>

<h2 id="conclusion">Conclusion</h2>
<p>Working on this project with the team was an excellent opportunity to gain experience in a simulated software development environment. <br />
We aimed to mimic a real-world software project by following Scrum principles and maintaining a solid GitHub workflow. Although we faced challenges along the way, we were able to deliver our MVP, deploying the completed app to the web.</p>

<p>If you’d like to dive deeper into the code or explore the project further, here’s the <a href="https://github.com/chingu-voyages/V54-tier3-team-35/tree/main">Github Repo</a></p>]]></content><author><name>Conor Barry</name></author><category term="Other" /><summary type="html"><![CDATA[Introduction Chingu is an online platform that brings together Scrum Masters and developers from around the world to participate in a collaborative six-week voyage (project). During this time, teams work together to deliver an app, all while adhering to Scrum principles. Our recent project was the creation of an AI prompt app, from the initial concept to a deployed app at the end.]]></summary></entry><entry><title type="html">What I Learnt Building a Full-Stack Task Management Application</title><link href="https://conordev.com/2025/04/19/task-app.html" rel="alternate" type="text/html" title="What I Learnt Building a Full-Stack Task Management Application" /><published>2025-04-19T00:00:00+00:00</published><updated>2025-04-19T00:00:00+00:00</updated><id>https://conordev.com/2025/04/19/task-app</id><content type="html" xml:base="https://conordev.com/2025/04/19/task-app.html"><![CDATA[<h3 id="objective">Objective</h3>
<p>I wanted to build a full-stack application to get hands-on experience with SpringBoot, React and REST APIs. Additionally, I wanted to take a concept from the planning stage all the way to deployment.</p>

<h3 id="programming-languages--frameworks--tools-used">Programming languages / Frameworks / Tools used</h3>
<ul>
  <li><strong>Backend</strong>: Java, SpringBoot, REST API</li>
  <li><strong>Frontend</strong>: React + Tailwind CSS</li>
  <li><strong>Database</strong>: MySQL</li>
  <li><strong>Containerisation</strong>: Docker</li>
  <li><strong>Deployment &amp; Hosting</strong>: GitHub Actions, Nginx, Oracle Cloud</li>
  <li><strong>Automated Testing</strong>: JUnit and Mockito</li>
</ul>

<h2 id="development-experience--challenges">Development Experience &amp; Challenges</h2>
<p>Building this task management application introduced me to a variety of new challenges and learning opportunities.</p>

<p>On the backend, one of the biggest hurdles was working with Spring Security. I quickly discovered that Spring Security keeps rapidly evolving, with deprecations and removal of methods between versions and the documentation isn’t always up-to-date or easy to follow. That said, Spring Security was still useful as it allowed me to implement robust authentication and authorisation mechanisms.</p>

<p>I chose Hibernate as the ORM to handle database interactions. I was pleasantly surprised by how powerful and easy it was to integrate with Spring Boot, allowing for smooth CRUD operations without writing SQL queries manually. <br />
I decided to use MySQL for the database, since each user has their own list of tasks, a relational database was an obvious choice for this application.</p>

<p>For handling authentication, I used JWT tokens. This allowed me to implement stateless authentication, where every user is assigned a JWT token upon logging in which is set to expire after a set time period.</p>

<p>On the frontend side, this was my first time working with React, and I found state management to be a challenge initially but overall, I enjoyed using React and found the documentation to be helpful. <br />
React’s single-page approach is different from traditional server-side frameworks like Flask and Thymeleaf that I would have been more familar with conceptually. Traditionally with frameworks like Flask, the server handles rendering most of the content, whereas in a React SPA, the frontend is responsible for much more of the user interaction and rendering.</p>

<p>I used Tailwind CSS to create a responsive design for the webpages, which I hadn’t used previously, but I found it very easy to use.</p>

<p>Modern browsers have a security feature known as the Same-Origin Policy (SOP), which prohibits a site’s JavaScript to make requests to another destination than the site itself.<br />
As my backend and frontend are hosted on different domains, I had to configure CORS in the backend to allow the frontend to communicate to the backend without being blocked by the browsers SOP.</p>

<p>So, the backend and frontend are running on different domains (and ports), how does the frontend talk to the backend? The answer is through a REST API.</p>

<h2 id="testing">Testing</h2>
<p>I used JUnit and Mockito for both unit and integration testing in the backend. Unit tests helped validate the behaviour of individual methods, while integration tests were used to verify interactions between different layers of the application (e.g., service and repository layers). With Mockito, I was able to mock dependencies to isolate and test logic without relying on actual implementations.</p>

<p><img src="/images/dev-env.PNG" alt="CI/CD Tests Passing" /></p>

<h2 id="deployment">Deployment</h2>
<p>Unexpectedly, one of the biggest lessons I learnt from doing this project was learning how to deploy it!<br />
I decided to use Docker to containerise my application for easy deployment, but when I tried to deploy my docker images onto the VPS running on Oracle Cloud, I ran into issues because the free tier VPS was running on a ARM64 architecture but the docker images had been built for a X86 architecture as that was what my own machine was using. So, I cross-compiled to ARM64 and was able to successfully deploy the application to the web.</p>

<p>However, this process was quite tedious to have to repeat every time I wanted to make a change to the application, so I decided to implement a CI/CD pipeline using GitHub Actions. This allowed the docker images to automatically be updated and cross-compiled using Docker buildx to both X86 and ARM_64 after I pushed any new code to GitHub.<br />
Another benefit was that my unit and integration tests would also be automatically executed after each push to GitHub and if the tests failed, the docker images would not be updated in order to avoid pushing buggy code to production.</p>

<p><img src="/images/ci-cd-tests.PNG" alt="CI/CD Tests Passing" /></p>

<p>Finally, I used a reverse proxy to proxy the API requests to the backend container running on Docker and used Let’s Encrypt to generate a TLS certificate for the deployed website.</p>
<h2 id="deployed-app">Deployed App</h2>
<p><a href="https://taskapp.librepush.net">Click here to visit the deployed app</a></p>

<p><img src="/images/taskapp_blog_post.PNG" alt="TaskApp/blogpost" /></p>

<h2 id="future-enhancements">Future Enhancements.</h2>
<ul>
  <li>Add OAuth integration</li>
  <li>Refresh the JWT tokens upon expiry.</li>
  <li>Add notifications for due tasks</li>
</ul>

<h2 id="conclusion">Conclusion</h2>
<p>I really enjoyed completing this project, from the initial scoping stage to having a deployed web-app at the end.<br />
Through the challenges I faced, I was able to learn more about React state management, CI/CD pipelines and Docker.</p>

<p>If you’d like to dive deeper into the code or explore the project further, here’s the <a href="https://github.com/CaptOrb/taskManager">GitHub Repo</a></p>]]></content><author><name>Conor Barry</name></author><category term="Other" /><summary type="html"><![CDATA[Objective I wanted to build a full-stack application to get hands-on experience with SpringBoot, React and REST APIs. Additionally, I wanted to take a concept from the planning stage all the way to deployment.]]></summary></entry></feed>